Search This Blog

Sunday, April 10, 2011

Yummies- Cake Pops!

  It's true I am jumping on the bandwagon a bit by planning on having cake pops as part of my wedding dessert bar, but they really are genius little treats. They do take a bit more time than baking a regular cake, but they add a certain pizazz to cake that no amount of fondant or icing flowers can.
  The original recipe was located on Recipe Rhapsody, but I have reproduced a shortened version here with a few tips and tricks to go along with it. My sister and I had a lot of fun making them together, but we will have even more fun eating them!


Ingredients and Materials:
Favorite Cake Mix
Favorite Frosting
Favorite Candy
Melting Chocolate
Lollipop Sticks
Florist Styrofoam blocks
Oven and Microwave

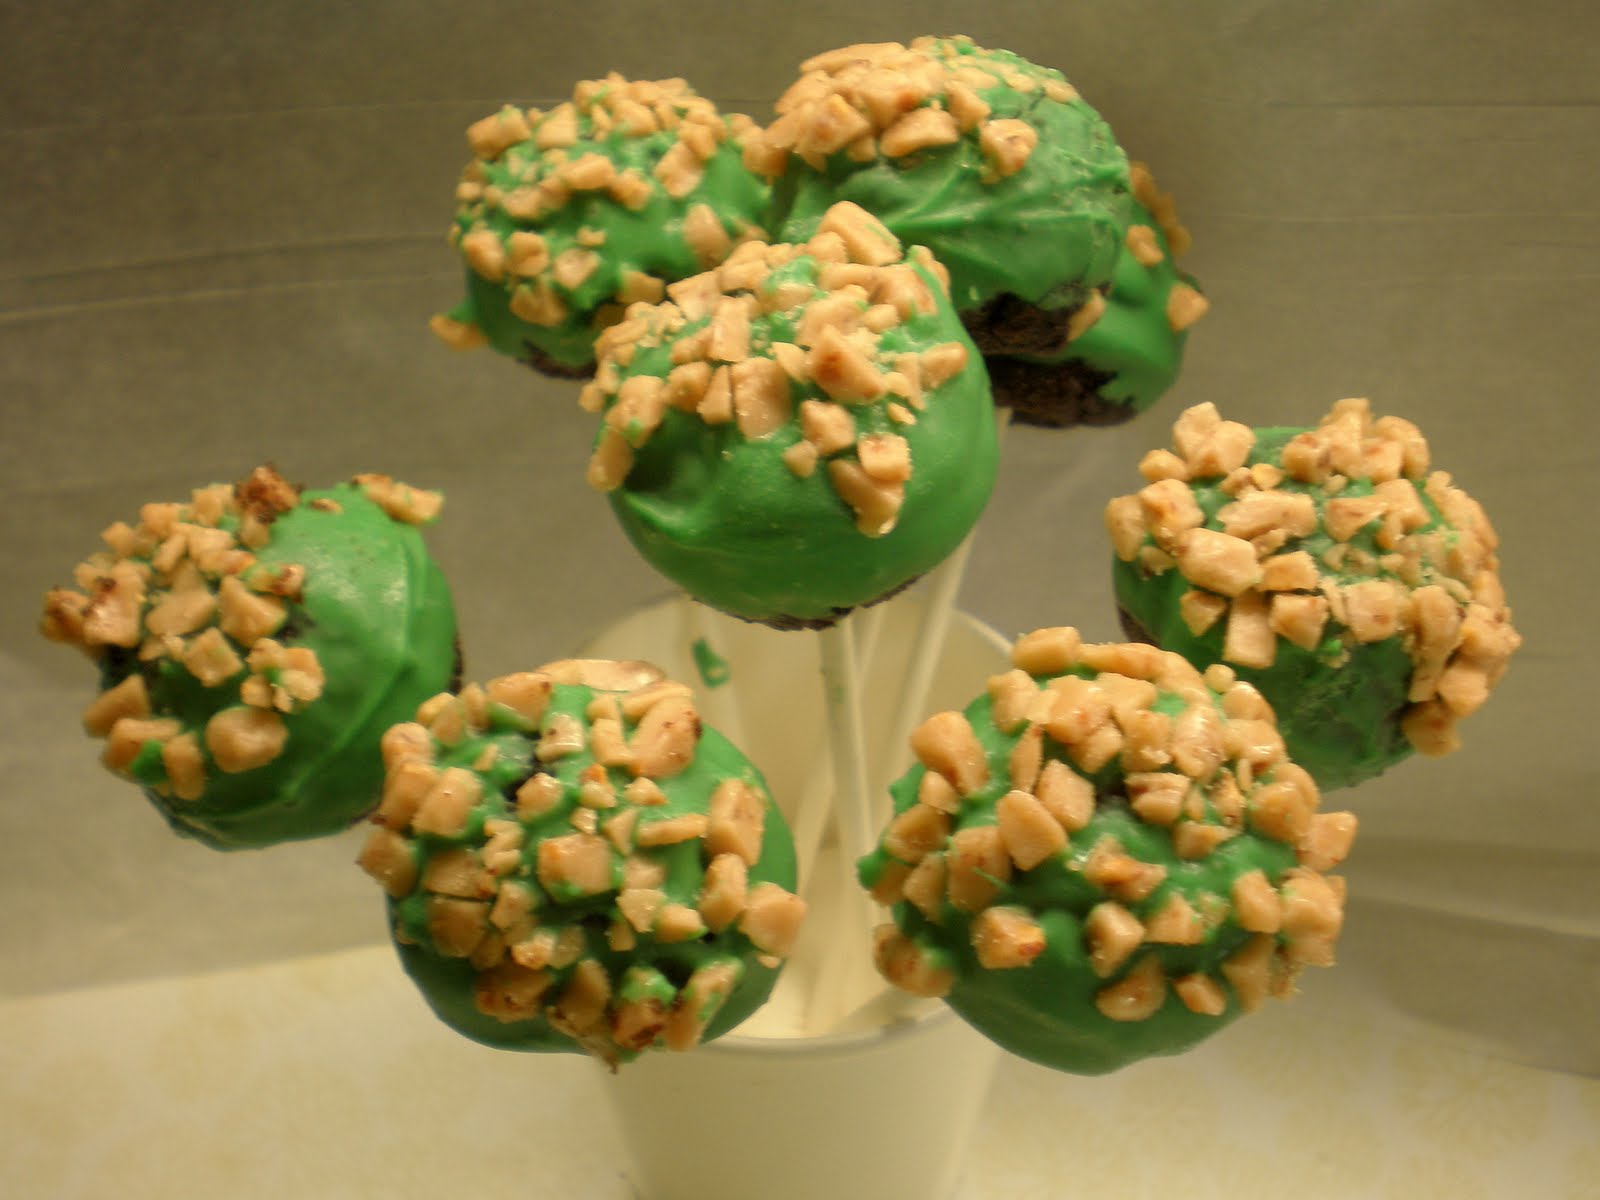
Step 1: Bake your favorite cake following the box's instructions or make Aunt Elma's family recipe from scratch. For the cake pops pictured, I choose a triple chocolate mix from my local grocer.

Step 2: After it has cooled completely, crumble into a large bowl.

Step 3: Add half a container of frosting to crumbled cake and mix with spoon well. I used chocolate butter cream. You will know it is mixed well enough if you can easily form balls with it. If they fall a part, mix more or add more frosting.

Step 4: Roll cake/frosting mix between balls to form balls (like you would clay). The recipe says to make them about an inch wide, but we discovered it was best to err on the smaller side than on the larger. Not only does it make it easier to coat them later, but they fit better in one's mouth if they are smaller. They will also be less likely to slip down the stick with the weight of the cake and chocolate if they are on the smaller side of an inch.

Step 5: Let balls chill on wax paper for at least 30 minutes.

Step 6: Melt some of the melting chocolate in the microwave. I used vanilla flavored, green colored melting chocolate. The deeper the bowl the better. We suspect an actual melting pot would be the best as it keeps the chocolate at a consistent melting point making coating easier.

Step 7: Dip in the lollipop sticks, then push the stick into the chilled cake balls. The chocolate will harden and help keep the cake ball on the end of the stick.

Step 8: After all the sticks are in the cake balls and have hardened a bit, you can melt more chocolate and begin to coat the outside of the balls. Submerging completely is the best to coat the balls evenly.

Step 9: Once you've coated the balls immediately dip them in your favorite crushed up candy, nuts or coconut. I used Heath bar bits, but toffee or crushed almonds would work too.

Step 10: Push stick into Styrofoam block, so that the chocolate coating can harden evenly. After you have filled your Styrofoam block full of cake pops, place it into the fridge to chill. Once the chocolate coating has hardened, then they are ready to serve!

  Note: These would make a great alternative to the huge piece of cake served at kids' birthday parties, which is usually too big and too sugary for them to eat. It's just the right size for those sugar and calorie conscious individuals. Also, anything on a stick is fun to eat, especially if you're five!

Monday, April 4, 2011

Craft Show!

Although I am a member, I will not be participating this time around, but I thought I would let folks know that if you are near Central Illinois there is a great craft show coming up featuring fellow Etsians. It is also located close to Bloomington, Champaign and St. Joseph, which are full of vintage clothing stores and antique shops if you want to make a day of it.

Here is a map of my favorite Central Illinois shops:
 Visit Central Illinois Vintage and Antique Shops


Tuesday, February 22, 2011

Featured Artist: Sister Shop Grand Opening!

Apparently, I am quite the influence (for better or worse) because my little sister has just opened her very own Etsy shop called A Gaslite Romance selling handmade Steampunk jewelry. Of course, I am super proud of her creativity, dedication, and willingness to try something new. I also happen to really like her pieces and covet the necklace above. I guess it's not much of a stretch to imagine that a woodland creature-loving, tree-hugging crafter like me might really love Neo-Victorian inspired jewelry, so I figured you might too.

However, I didn't just want to shamelessly promote my little sister (even though she deserves it), but give you more of a "Featured Artist" experience. You will have to bare with me as this is my first interview and I wanted to be as informative as possible. Anyway, hope you enjoy!

Interview with A Gaslite Romance:

Q: What is the most important fact a buyer should know about you?
A: The most important thing buyers should know is that I pour my heart and soul into all of my pieces and I truly hope that comes across in the finished product.

Q: Why did you choose jewelry as your craft of choice? Or did it choose you?
A: I would say it was a little of both. I fell in love with Steampunk jewelry and got the crazy idea that I could try my hand at it.

Q: What is your favorite thing about creating jewelry?
A: My favorite thing about creating jewelry is the process. It starts with an idea and sometimes it turns out exactly how I envisioned it. Other times it takes a completely different route and the end result is even better than I envisioned.

Q: What movies/books/media/artists have inspired your style?
A: I am mostly inspired by all things Victorian and the Steampunk culture. That particular era is just timeless. While technology is a necessary evil, I am just fascinated by the beauty and complexity of the mechanical workings of technology of the past. I am also inspired by my sister who has a much keener sense of creativity. 
  (this is me blushing)

Q: What are your Top Three favorite Etsy shops and why?
A: Steampunkjunksupply - They offer great quality and variety of supplies necessary for my craft.
Nouveaumotley - Is the very first shop that got me interested in Steampunk jewelry.
Edmdesigns - Has amazingly beautiful and intricate Steampunk designs that I can only wish I was capable of.

Q: Where do you see you, your craft and your shop in twelve months?
A: I hope that in twelve months I will continue to grow as an artist. I hope that I will gain experience necessary to hone my craft. I hope that I will still be able to enjoy my hobby while sharing it with others.

Note: If you or others are interested in being a "Featured Artist", then let me know and I would be happy to spread the love.


Etsy Trade Success!

I have been offered many trades at my shop on Etsy, but none of them have intrigued me enough to participate (unfortunately, money is a necessity to continue my hobby) until Annie Carvalho, a fiber artist, came along. Immediately her work stood out and I saw an opportunity to get my dog, Jersey immortalized in soft, lifelike felt and grabbed at the chance!

I was nervous at first to put myself out there and risk all the hours/dollars, but we swapped many emails and pictures, which helped to ease my fears. I finally sent off the infamous Hobbit Hole with the same trepidation I always feel when I send one of my creations out into the world, but I was enthusiastic to receive my sculpture and felt it was truly worth it.

I know I am not alone when I say that I love to receive mail (sans bills), so when I saw the little postage box waiting for me today after work I was so giddy I couldn't get in the door fast enough. After ripping through the packing tape, I gently lifted out my very own, miniature sculpture of my favorite furry buddy. It was so much more than I could have imagined and well worth the wait! It will serve as a precious memorial long after she is gone.


Check out the Hobbit Hole at its new home as a photo prop for Annie Carvalho's whimsical fiber sculptures!

Wednesday, February 2, 2011

Welcome to the New Year!

I realize that we are now a month into the new year, but it has been a crazy month to say the least. I have already taught an entire novel, rearranged my craft space, broken the zipper on my favorite winter coat, gotten over a horrible flu and survived two snow days! However, through this all I have continued to be grateful for one of the holiday gifts I received as it has continued to inspire me. I was lucky enough to receive Craft Magazine issues one through ten!

I have always enjoyed their website, but the tangible copies are priceless. They reserve a very special spot on my crafty shelves. Not only are the projects listed easy to follow, but give me a chance to branch out with everything from cooking recipes to new sewing projects. I am able to practice old skills and learn new ones with this awesome collection. It was one of my favorite gifts this year and I hope to make it a favorite of someone else's soon.

Saturday, December 11, 2010

Holiday Promotion Winners!


Here are the winning results of my Holiday Promotion:

First Prize Winner:
www.Alexissage.etsy.com

Second Prize Winner:
www.Imani247.esty.com

Check your Etsy conversations or the email attached to your Etsy account to collect your prize.
Thank you to all the participants and enjoy this holiday season!
1.  

Sunday, November 28, 2010

Holiday Promotion 2010

Enter your name in a drawing to win a coupon for The Market in the Glen to use this holiday season. Entries will be taken from now until Dec. 11th, 2010. There is a 1st prize and a 2nd prize winner for this drawing. The 1st prize winner will receive a holiday coupon for 15% off any item in my shop and the 2nd prize winner will receive a coupon for 10% off any item. You can have up to two entries for the 2nd prize and an almost unlimited amount of entries for the 1st prize. The winners will be chosen randomly using the random number generator and announced Dec. 12th, 2010. 

To Enter for a Chance to Win the 2nd prize (a 10% off ANY item coupon):
-Become a Follower of this blog 
-Favorite my shop at www.themarketintheglen.etsy.com

To Enter for a Chance to Win the 1st prize (a 15% off ANY item coupon):
-Refer a friend to my shop OR blog and have them Follow or Favorite me
-Mention my shop on your blog OR link to this promotion on your website
-Buy an item from my shop during the run of this promotion and receive an automatic entry to this drawing
-Feature one of my items in your Treasury during this promotion

Note:
-If you were referred by a friend, be sure to include the friend’s blogger or Etsy name to ensure they get a chance at the 15% off coupon code.
-If you are unsure whether your correct email is linked to your Etsy name or blog name, then leave one I can email you with the coupon code in the event that you win OR check this blog on Dec. 12th, 2010.
-Coupons will expire Jan. 6th, 2011

Thursday, November 18, 2010

Celebrate First Blog Mention!

  As a devoted tracker of my Etsy lovers on Craftopolis, I noticed a sudden spike on Monday in my pageviews and lovers, but could not figure out why. They took the Treasure Tracks feature off, so I could not instantly see if it was due to being featured in a popular Treasury or not. I turned next to Socialmention, but was still left dumbfounded. I tracked myself down in the Etsy Treasury search, but that didn't initially explain 236 new visitors with 827 pageviews and 9 new lovers. I waited for my Web Analysis to close at the end of the night to find out my traffic sources, but it still didn't give me a clear enough picture as most of the links were expired by the time I looked at them.
  Thankfully, Beckykazana sent me a message with the link to her Treasury's frontpage appearance on Craftcult, which you can view here and her blog. I was so excited I was gushing like a little girl- my first blog mention! She was kind enough to feature my Hobbit Hole Miniature Dollhouse, which is one of the most peeked at, searched for and favorited items I sell. It went along well with her other Scandinavian/gnome finds. She is certainly one of those people with a knack for putting together awesome Treasuries!
  I thought I would share this exciting milestone I have reached as I am hoping it is an indicator in the general trend my shop is taking this holiday season. I am already enjoying record sales, renewed interest and beaming confidence. I also think it is important to have a web presence and to be aware of what is available, which is why I link to my resources as much as I can. Hope you find some of this information helpful and/or inspiring.

Sunday, October 10, 2010

Yummies- Pumpkin Cookies

I look forward to autumn every year! From its festivals, costumes, decorations, changing leaves, and bonfires, but especially the food. I really enjoy the warm, hearty foods like roasts, mashed potatoes, soups, green beans, squash and tart cranberry sauce, but I absolutely love all things pumpkin!

My favorite among favorites are the pumpkin cookies from our local gourmet food store Art Mart. The smell alone of pumpkin spices baking have me dreaming of the cookies alongside a tall, ice-cold class of milk. I have found recipes that are similar, but nothing beats Art Mart's homemade goodness and the tradition of a once-a-year treat. I consume an unhealthy amount to satisfy my year-long lust and they are worth every single calorie.

My family's other must-have every autumn is a trip to Curtis Orchard where we stock up on apple butter, homemade doughnuts, cider, mulling spices and every variety of fancy pumpkin we can find. This is truly our favorite time of year and we pull out all the stops from creepy decor to true pumpkin carving art. We do out best to savor the cinnamon and cider while the weather stills permits because cold November rain is just around the corner!

Keep watching for more photos of our pumpkin creations.

Saturday, September 18, 2010

Sale Ending Soon!

My Grand Opening Celebration Sale is scheduled to end Sept. 21st, so get my handmade whimsy now and save for the holiday season! My dollhouses make great gifts, so don't hesitate! If you have any questions concerning any of my products for sale email me or contact me through Etsy.

Happy Almost Fall,
Danielle of
The Market in the Glen

Dyeing for Peace- Tips & Tricks

Along with many people all over the world our school is celebrating the International Day of Peace on September 21, 2010. We will be joining Montessori Schools around the world at 11:00am and singing "Light a Candle for Peace". This world event will start in New Zealand and travel around the world for 24 hours with each school joining in at their local time. There's a great article about in from the Examiner, so check in out for more details.

Our school decided to invite parents and do some fund raising during this time for our Upper Elementary and Middle School participation in MMUN. We'll have the usual backed goods, but also official UN gear and tie-dyed socks of various colors and sizes. My boss coined the clever slogan "dyeing for peace" and I anticipate all the kids will want a pair. I thought I would share some tips and tricks with all of you concerning sock dyeing.

Tips & Tricks for Sock Dyeing:
1. Try to get thin, all white 100% cotton socks for the best results. The thicker ones made to wick away sweat just don't dye well.
2. Be sure to pre-wash to remove any sizing or other chemicals the manufacturers use. Otherwise the colors won't be as bright or even.
3. Protect clothing with plastic bad aprons or wear what we call "painting" clothes. Shoes are the most likely to get dripped on, so don't wear them. Go barefoot because feet are much easier to clean!
4. Set up your work space outside to easily managed spills and mess.
5. If you are not using a kit, I suggest Rit Dye. It comes with very good instruction on how to dissolve the powder into hot water. It is also important to use the salt and detergent they ask for in the instructions to get the brightest colors. They've been the dye of choice for years, so trust their instructions.
6. While you are setting up your dye bath, keep the socks soaking in hot, clear water. Wet fabric absorbs dye quicker and more evenly.
7. If you are doing a big batch, you will likely need a place for some of them to sit while you finish the others. We spread garbage bags out on the grass next to our dye bath wash tubs and just piled like colors together while we finished the other. Remember that while they are sitting together they are likely to bleed, so put only the same colors next to each other.
8. Have the kids twist and rubber band them into as many crazy shapes and designs as they want. Our kids really loved this part and their designs came out great.
9. If you are doing various sizes, keep pairs together to make life easy. This takes more workspace and planning, but will result in the less stress.
10. If doing two or more colors on one sock, remember to do its matching pair in a similar pattern. Keep in mind socks come in twos, even though they will be twisted and tied separately.

The dye sets really well and after rinsing in the sink with cold water, they were all set to be washed together regardless of color. Watch for pictures of use wearing our socks "Dyed for Peace".

Sunday, September 12, 2010

What Sets My Dollhouses Aside From All The Others?


Environmental Impact
The creation of my dollhouses uses a lot less fossil fuels than the plastic, big box store versions available for purchase. Almost all of the materials used are handmade by me or someone else out of natural materials using traditional methods, which create a much smaller carbon footprint. They are also much more durable and able to last for generations thus creating less waste in the end. Also, as a business we are always looking for ways to reduce waste, combine shipping, buy local, use sustainable materials and do our best to make our products with as little impact on the Earth as we can.
One of A Kind
As a buyer you can rest assure than no one will ever have another dollhouse like yours. Every dollhouse I create comes out of unique vision and the effort it takes to make each one special means that no two will ever be the same. I also use locally available materials, which means that often times the same materials are not available again for replication. This is also not a product you will find in a corporate owned chain store or lined up on any shelf with twenty others like it. You can take pride in having a dollhouse with its own unique story and a life all its own.
Fads Fade!
Unlike many popular toys and products on the market right now, my dollhouses won’t fade with the next blockbuster movie or children’s television show. They are made and inspired by classic fairy tales that have been around for hundreds of years. They are also so versatile that they can be changed, added to, adapted to fit the whims of you or your child. My dollhouses are also made durable enough with metal hinges, quality materials and with children in mind to be passed on from generation to generation creating a family history inside every one. Think of it as not only a gift for your child, but also your grandchildren and possibly great grandchildren. You can have the power to inspire generations with my dollhouses that other plastic versions just can’t hold up to.
Educational Tools
As an educator, I cannot help creating things without this at the forefront of my mind. I try to use fairy tales as a basis for my dollhouses because they are stories that bridge the generation gap. They also feature lots of repetition, which makes it easier for kids to learn. Almost all stories are derived from the basic structure of these childhood stories and are often used in classrooms to teach beginning writing. I also take pride in making them as gender neutral as possible. Research shows that pretend and imaginative play is necessary for both boys and girls in developing social awareness. They learn to negotiate many situations through imaginative play that they may not otherwise be able to do. My dollhouses allow you and your children to create whole new worlds of wonder to share for years to come.

Cost Comparison
If you compare the costs of my dollhouses to those of comparable size, quality and amount of accessories then you can see how I have tried my best to save money when possible to create something unique and affordable. I often plan a season ahead and shop around to get materials on sale in order to pass this savings on to you. I also do my best find ways of creating things in the most efficient and cost effective way, because I don’t want my products to be absurdly unattainable to the average family. Not only are my dollhouses beautifully handmade with care and love, but you won’t find anything cheaper on any market for the same quality; I know because I have tried. Think of it as an investment in art, a family heirloom, the handmade movement, and with all the added benefits of low environmental impact and no labor exploitation.    
Supporting the Handmade Movement
The handmade movement is about many things, but most of all creating quality products and creating a personal relationship with the buyers. You don’t have to worry about the exploitation of labor inherent in so many of our daily purchases because you know exactly where this product came from, how it was created and by whom. There is no corporate agenda or stock market bottom lines to meet, so you can be assured that quality materials are being used and trust the seller’s intentions. You can also feel good about supporting artists and craftsman who might not otherwise be represented because their work doesn’t represent what the galleries and boutiques deem fashionable at the moment. Many people involved in the handmade movement do so out of love for their work and struggle as parents with regular 9-5pm jobs. You can find pleasure in supporting the work they do that brings them joy. When you buy handmade you become part of the movement, so don’t hesitate to join up and spread the word!

Saturday, September 11, 2010

Inspiration- The Doll House Book


Dollhouses and other miniatures have always fascinated me. They have the ability to transport you and send the imagination spiraling. I marvel at the impossible details in such minute craftsmanship. It can seem likely a really frivolous hobby, but I think it embodies the true beauty of “art for art’s sake”. I also love how they seem to mark a place and time like a record in history. Antique children’s toys really strike me as objects with stories to tell, so I never tire dreaming up what story a dollhouse might tell.
I recently came across “The Doll House Book” by Stephanie Finnegan and I highly recommend it. This whimsically shaped book discusses the origin of doll houses and follows them through time to modern day. It showcases many talented doll makers like Dame Darcy and famous personages houses like Queen Mary’s. It even has a section on my all time favorite house, Colleen Moore's "Fairy Castle", which I have dreamed about since seeing it as a small girl. It made me really appreciate how dollhouses have influenced popular culture, children and even history.

Monday, August 30, 2010

School is Back!

School is here in all its glory and I am back to not being able to find enough hours or sleep in the day. My crafting life has been temporarily put on the shelf as I get back into the routine of working 60 hours a week between planning, cleaning and actually being present at school. It always takes about a month for everything to click into place, so I am looking forward to October. I am hoping all the planning and promoting this summer will help keep the Etsy shop afloat while I get back into the swing of things. I'll keep you posted on my availability and upcoming projects.

Friday, August 20, 2010

Inspiration- Music!

   Last night I saw Tegan & Sara and Paramore live at the White River State Park in Indianapolis. I have waited for over a year to be able to see T &S and I was much rewarded. I had a great time rockin' out and it made me think of all the music that inspires me and my creative process, so I thought I would share.

1. Bjork- I really love any music in another language, but her voice and her sound is so different and unique. Some songs are edgey, some are soothing and some are just darn right beautiful. She has an energy that allows me to clear my mind and focus only on being creative. Her music videos can be very inspiring from an artistic point of view too.

2. Emilie Simon- Again, I find French another beautiful language to listen to and her music is very earthy. In fact, I love listening to the movie, Amelie in the background for many of the same reasons. The cadence and rhythm of speech really get inside me without over-taking my brain. Her videos will also leave you a little breathless.

3. Tegan & Sara- This is a little edgier that my first two and in English, so it works well for painting. As a younger painter I used to love to listen to Ani Difranco, Sleater-Kinney and Mutabor. There was a lot of angst I needed to get out and all three help feed that energy.

4. Imogen Heap- This is another one in the same line as the first three, but there is poetry in the music that really appeals to me. You must be sensing a theme now that female vocalists really trigger something for me. There is this sense of power, mystery, admiration and emotion that I can really relate to with female vocalists whether they are Tori Amos, Janis Joplin, Dresden Dolls or Alanis Morissette. I could go on and on as my music collection is largely all-female, because I like surrounding myself in beautiful things.

*Here are some male vocals I enjoy, if you prefer: Coldplay, The Decemberists, Flogging Molly, Postal Service

Can you tell music is a big part of my life? Feel free to recommend any female OR male musicians.

Thursday, August 19, 2010

Two New Obsessions

  I need to share my two new obsessions with you because I just can't contain my excitement any longer!

1) Craftopolis takes all your Etsy statistics and Google Web Analytics and combines them in a fun, user-friendly way to give you a good idea who is looking at what, and whether they love it or not. It also has a tab to show you which Treasuries you're in. Finding out I have new "lovers", new "hearts" and new "treasure tracks" always brightens my day!

2) Spoonflower was recently featured on the Etsy Blog, but I have just ordered my first test swatch of my own design! Oh my goodness are the possibilities endless! I have been having so much trouble finding fabric I like and need around here, so I love that I can save stress, gas and time by just creating what I need. I also have ideas in the works to create "fairy" inspired fabrics for durable fairy bedding and other creations to sell to all of you. I'll keep you posted.

Saturday, August 14, 2010

Inspiration: What's in the name?

I have recently joined the multitudes at Swap-Bot to try to challenge myself creatively and give myself something to do when the shop is slow. I was turned on to this site when a customer of mine bought a Fairy Nest Bed from my shop to give to her swap partner for a "fairy furniture" swap. I have so far participated in only a handful of swaps and haven't yet received anything from my partners, but I wanted to share a particularly poignant swap with you; "ATC inspired by your Username".
  For those of you who are unfamiliar with ATC or ACEO, Wikipedia has a great article as usual and Swap-Bot has a glossary of terms. Basically they are miniature works of art about 2.5" x 3.5" long. Many Etsy artists sell them, so that you can collect their work without breaking the bank or cluttering your walls. Of course, many crafters like myself make them for fun to trade and not for profit.
  Anyway, I thought this ATC project would be good to share with you as my "username" is my shop name and I often find that what others are inspired by inspires me.
 
1. Firstly, my shop name went through many iterations. However, from the beginning I was largely influenced by Christina Rossetti's poem, "The Goblin Market". I have loved this poem since I discovered it as a pre-teen. It is a rare one that tells a story without boring you to death. It also captures almost all the rules fairytales are supposed to teach us about not eating fairy food or following fairy music. It is largely about temptation and well the irony is that I am tempting you to buy "fairy" goods. Unfortunately, this name was taken by one of my favorite fairy artists, Brian Froud.

2. Then I tried to imagine where such a market might exist. I thought back to all the "magical" places I have visited over the years and I kept coming back to one image. The following is the closest I have come to the deer clearing I used to visit in the woods behind our house. It is the dappled light and variety of greens that appeal to me mostly.
3. Then I need to put a name to this image and place in my imagination; a glen. This fit particularly well because my father's name is Glenn, which I have always thought was telling of his Irish heritage and in many ways it felt that I had come from such a "glen" (pun intended). Thus the name was born and a more cohesive branding was possible.

You will see lots of articles in Etsy's The Storque about choosing your shop name carefully and researching to make sure no one else has it, and this is for a reason. It should be easy to remember, say something about your shop's intentions and not be used by so many others that it is hard to distinguish you from everyone else.

Below is a picture of the ATC I created. It is my first attempt at something so small and it came out a but like a funerary card, but I am hoping it reaches someone who has never heard of Christine Rossetti and in turn, finds as much joy as I do in reading her work.

Friday, August 13, 2010

Yummies- Cherry Jubilee Sauce

The other night I decided to make Cherries Jubilee to go with all our left over frozen yogurt and it was so yummy that I am still craving it. Serving it hot melts the yogurt, but really tastes the best.
Prep Time: 15 Minutes                    Cook Time: 15 Minutes

Ingredients:
1/2 cup Sugar
1 tbsp. Cornstarch
1 Orange
1-3 cups Cherries, pitted
1 tsp. Vanilla
Vanilla Frozen Yogurt

1. Grate peel of orange until you have 1 tsp.; set aside. Cut orange in half and juice until you have 1/4 cup juice; set aside.
2. Combine sugar and cornstarch in small saucepan. Blend in 1/4 cup water and orange juice. Cook and stir over medium heat until thickened and smooth, about 5 minutes.
3. Add cherries, orange peel and vanilla; bring to a boiling and reduce heat to simmer about 10 minutes.
4. Serve over frozen yogurt and enjoy!

Nutritional Info. (full recipe)- 180 Calories, Og fat, Og saturated fat, 45mg sodium, 135mg potassium, 40g carbohydrate, 1g fiber, 33g sugars, 4g protein

Note- Pitting 3 cups of cherries may seem like a lot to you, so rest assure that 1 cup equals two very large servings. Also, make sure you choose ripe, sweet cherries for pitting.

Monday, August 9, 2010

Tips & Tricks- Tea Dying

  I have been using tea and coffee to dye fabrics and paper since I was a little girl making treasure maps and fantasy tour guides of other worlds. I decided to dye some material my mother had left over from making drapes and an old cotton t-shirt that I accidentally stained with my new blue swimsuit. The steps below show I what I do for fabrics, but paper is very similar.


Step 1: Decide whether to pre-wash fabrics. I don't really worry about this step because if it doesn't come out dark enough or evenly dyed, then I use it for something else or try again. I like the adventure of not knowing exactly how it will turn out, but if you feel the need to pre-wash check the fabric's washing instructions.

Step 2: Fill large pot, wash tub or bathtub with the hottest water that will come out of your faucet. Dunk as many tea bags as desired (without paper tags) into the water and using a spoon to stir them. This will release all the tannins that dye the fabric.

Step 3: Rinse fabric under faucet to dampen the fabric. This makes it easier for it to soak up dye faster.

Step 4: Dunk fabric in water, so that it is covered completely. If you are worried about it floating above the surface use pie weights to hold it down.

Step 5: Wait as long as you desire as the longer you wait the darker it will be. I usually wait just a few hours. Remove tea bags and discard or set aside for reuse.

Step 6: Ring out fabric and rinse. Discard tea.

Step 7: Follow the fabric's instructions for drying or dry on hottest heat. You can also sun-dry or air-dry depending on your needs.

 1. Original White Drapes 2. Ginger Tea Dyed Drapes 3. African Bush Tea Dyed Drapes

Choosing Tea:
Most people recommend cheap, black tea, but I like to use my old stock. This time I used some ginger tea and some African Bush tea. The ginger gave a light, yellow tinge to the drape fabric. The African Bush tea (see first picture) gave a reddish, brown color to the drape fabric. The cotton t-shirt turned so many colors from the ginger tea I can't wait to figure out what to use it for. The antique look these fabrics get after dying make them so much fun to turn into cloth dolls, mixed media art and even creative gift wrapping!

1. Stained Cotton T-Shirt after Ginger Tea Dye 2. Drapes after Ginger Tea Dye 3. Drapes after African Bush Tea Dye
 

Saturday, August 7, 2010

Yummies- Blueberry and Mango Fruit Sundaes

Tonight my foodie partner made a delicious dessert that was not only beautiful, but ridiculously yummy! I love summer-time and all the fruit that is available, so I thought I would share this cool treat with you so that you can impress your guests/family/self without feeling too guilty about the calorie count.


Prep Time: 15 minutes (unless you have to run out to get the sugar you forgot)
Cook Time: 7 minutes (do this ahead of time, if needed)

Ingredients:
1-2 Mangoes, pitted, peeled and diced (ripen via bag-in-refrigerator method beforehand, if needed)
1-3 Cups Blueberries
1-2 Limes
1/2 Cup Sugar
5 Mint leaves
1 qt. Vanilla Frozen Yogurt

1. In a large bowl combine diced mangoes and blueberries; set aside
2. Using a veggie peeler, remove the peel from limes in strips; set aside. Juice limes to measure 3 tbsp. juice; set aside.
3. In a small saucepan bring 1/2 cup water, lime peel, sugar, and mint to boiling over medium-high heat; stir until all sugar dissolves. Reduce heat to medium-low; simmer 3 minutes. Remove syrup from heat.
4. Place syrup in small bowl. Stir in lime juice; let stand 15 to 20 minutes. Remove peel and mint; discard.
5. Drizzle syrup over fruit; toss to coat.
6. Scoop yogurt into individual dessert dishes and spoon fruit over yogurt. Serve and Enjoy!

Nutritional Info- 230 calories, 0g fat, 0g saturated fat, 4mg cholesterol, 70mg sodium, 55g carbohydrate, 3g fiber, 5g protein

Full Recipe- Serves 8

Note-
*The ingredient list is listed with so many ranges because it should really be to taste and what is available fresh in your area. Also, there are only two of us, so we reduced it to the lowest number to have less waste and less added to our waist.
**The maxium number of limes can be too much if you are not a fan, so reduce as you see fit.
***The ripen via bag-in-refrigerator method means that you may need to buy your mangoes a couple of days in advance, seal them in a bag and place them in the refrigerator. If you are really pressed for time, place them with a banana in a sealed bag.
****Steps 3 and 4 can be done ahead of time and saved in the refrigerator a day or two until the family BBQ. Wait to do Step 5 until right before serving or the fruit will go bad.
*****Garnish with mint leaves if you are feeling extra fancy.